Your decision to leave Facebook is certainly none of my business, but whatever your reasons, you have my full support and I wish you well for whatever’s next on your social networking journey.
There’s just one pesky little detail: getting all your digital belongings packed up before you close things down. And of those belongings, the oodles of photos and videos you’ve uploaded to Facebook should be the first things you load into your metaphorical lifeboat.
Fortunately, it’s a pretty easy task. And you probably already have everything you need to do it—namely, a Google account and enough storage space for all your memories. It’s possible to do this from your phone, it’s easiest to do it from a computer, so you can download a proper, offline backup as well.
More on that in a bit. Let’s get clicking.
First, check your space
Photos are big, videos are bigger, and Google only gives you so much free storage space.
To check how much you have, head to the Google One storage page to see where you’re at.
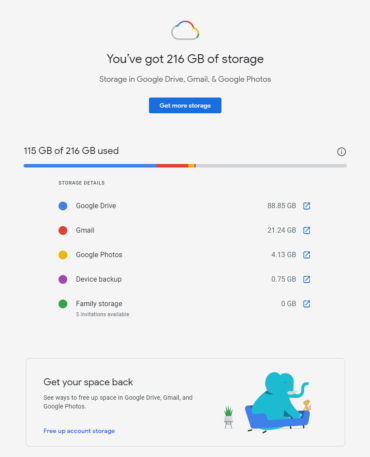
As you can see, I’ve got plenty of storage here. I should! I pay for it.
If you think you’ll need more, try the “Free up account storage” link or buy additional storage further down the page. For what it’s worth, I pay $30 a year for 200 gigabytes, which should be plenty for most people.
When in doubt, skip this step and come back to it if your Facebook stuff doesn’t fit.
Now, over to Facebook
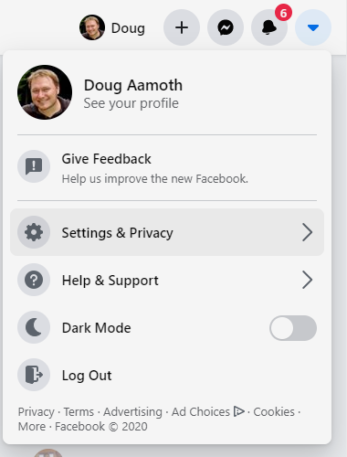
OK, let’s light this candle. Head over to Facebook, log in, and click the little down-arrow thingy in the upper-right corner near your beautiful face. Then select the “Settings & Privacy” option, followed by the “Settings” option in the next menu.
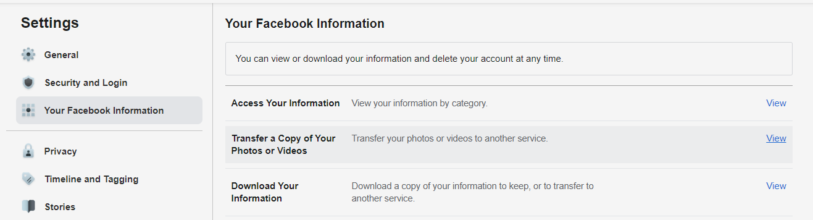
Once you’ve done that, choose “Your Facebook Information” in the left-hand menu, and choose “Transfer a Copy of Your Photos or Videos” from the pane on the right.
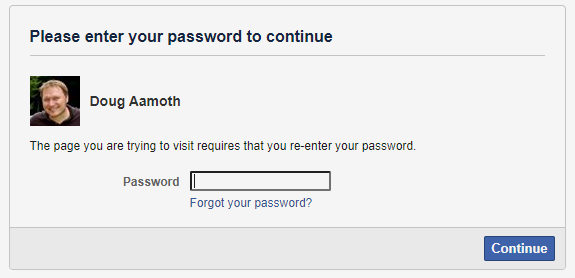
You will now need to reenter your Facebook password. Fun fact: I use Facebook so infrequently that the below photo of me is about 10 years old.
The time has come to get the photos and videos
An exciting stage, to be sure.
At this point, you have the option to download your photos and videos directly to your computer. You can do this by clicking the “Download Your Information” link and then click the “Create a File” button on the next page. Use this section to download all your other Facebook stuff as well, if you like.
![]()
However, whatever you pack up using this option gets divvied into multiple folders and presented to you as an HTML page. It’s fine as a backup, but it’s a bit clunky. That being said, do this so you have a backup on your actual computer.
Once that’s done go back and click the “Choose Destination” dropdown and choose the only option: Google Photos.

You’ll need to do this one time each for photos and videos. Choose whichever you want to do first, then click the Next button.
From there, you’ll need to connect to your Google account and grant Facebook permission to add to your Google Photos library. So do that, if you please. It’ll take a couple clicks of the various Allow buttons.
You’re now signed into Google and ready to transfer your photos or videos. Click the blue “Confirm Transfer” button to do just that.
![]()
The transfer process could take a while, especially if you have a lot of photos or videos. Check the progress in the “Activity” panel and/or take a nap or get some exercise.
Now, over to Google Photos
Drumroll, please. The moment of truth is upon us!
Head over to photos.google.com and say, “Hey, where the hell are all my Facebook photos?”
Well, either helpfully or unhelpfully depending upon your disposition, Facebook has taken the liberty of slotting your photos into your Google Photos library by the date they were taken. So if you, like me, haven’t uploaded a photo to Facebook since 2012, you’re going to have to weed through all your 2012 photos to find it.
There’s another way as well, but it’s not very intuitive. Click this link to see your recently-added photos:
https://photos.google.com/search/_tra_
Et, voila! Behold your transferred Facebook photos.
You can also clunkily navigate directly to your most recent photos by clicking in the Google Photos search bar, waiting for the menu to expand, clicking the “Show more” link in the box that has “Favorites, Videos, Selfies, Screenshots” at the top, and choosing “Recently added” way down at the bottom.
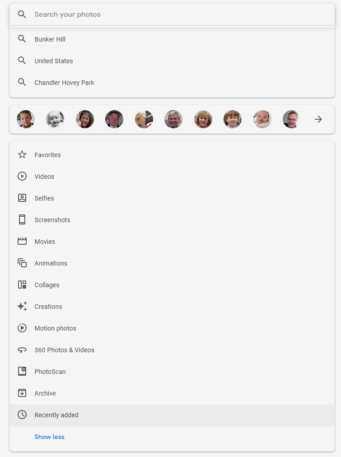
Intuitive, no?
Recognize your brand’s excellence by applying to this year’s Brands That Matter Awards before the early-rate deadline, May 3.
