
“I wanted to quickly circle back on my email below.”
“Following up on the below.”
“Just wanted to check in.”
Behold, the futile pleas of people who are no longer welcome in my inbox. I have permanently banished them to an obscure Gmail folder called “Screened Out,” which I might glance at every few days but mostly just ignore. Over the past few weeks, as my Screened Out list has grown, my inbox has become ever-more peaceful. To anyone who gets a high volume of annoying emails, I highly recommend creating a similar list for yourself.
The joy of the “Screened Out” folder
The primary inspiration for adding a banishment folder to Gmail came from my brief experience with Hey, the new email service from Basecamp. Although Hey ultimately wasn’t for me, I loved some of its ideas, including the “Screener” process for giving a yay or nay to new contacts as they email you. If you decide that a contact isn’t inbox-worthy, you can bounce all their future messages to a “Screened Out” folder, which is hidden behind an extra menu.
(Full disclosure: Google officially calls Gmail’s organization system “Labels,” and doesn’t consider it to involve folders. But to most of us, Labels sure feel like folders.)
Creating a Screened Out folder is not the same as blocking people or marking their emails as spam. While a Spam folder contains true junk—offers for sketchy pills, ads for dubious online casinos, blatant phishing attempts—a Screened Out folder is for emails you might at least want to glance over. Maybe they’re from a colleague whose messages are never that important, or from a mailing list you’re obligated to be part of. Screening them out keeps your inbox clean without confrontation.

As a tech reporter, most of my inbox clutter comes from press pitches. If I get a PR pitch that’s irrelevant to my coverage with no built-in unsubscribe option—that’s most of them—I’ll just create a filtering rule in Gmail that punts the sender to the Screened Out list. I’ve been sticking to this regimen for a few weeks now, and adding new contacts to the list has been satisfying every time, especially when I check the folder and see them following up in vain.
How to screen out your emails
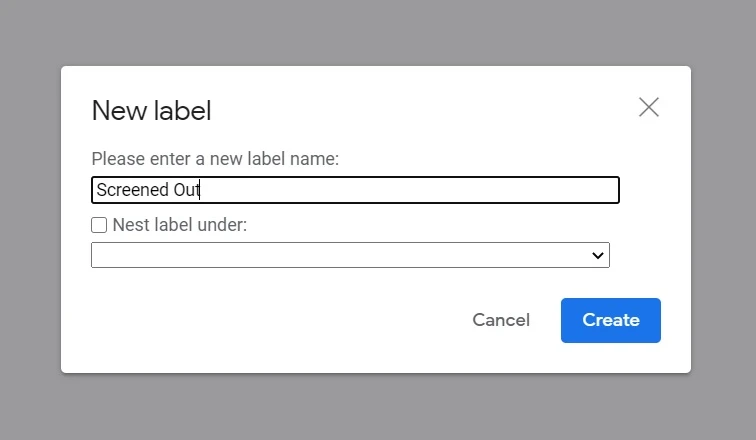
If you’re using Gmail, you’ll first need to create a new Screened Out label. You’ll find the “Create new label” option by scrolling to the bottom of the left sidebar. (You may have to hit “More” at the bottom of the sidebar first.)
Whenever you receive an unwanted email, follow these steps:
- From the inbox, right-click on an unwanted email, then select “Find emails from (contact name)” in the pop-up menu. This will bring up a list of all the emails that person has sent you.
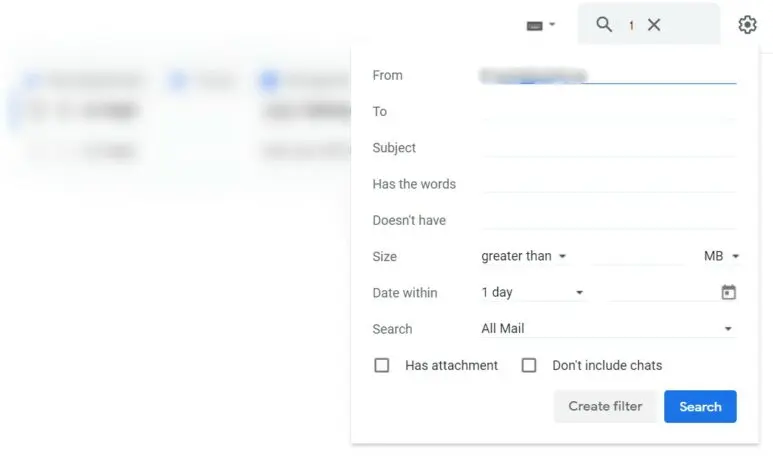
- Make sure you won’t mind missing any future emails from this contact, then hit the down arrow at the right end of the search bar and select “Create Filter.”
- As an alternative to the steps above, you can click the vertical “…” at the top-right after opening an email, select “Filter messages like this,” then select “Create filter.”
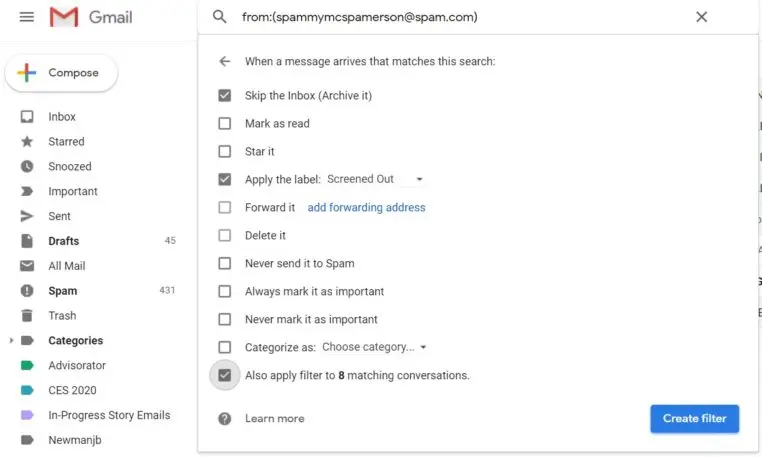
- On the next screen, check off “Skip the Inbox,” select your “Screened Out” label next to “Apply the label,” and check off “Also apply filter to matching conversations.” Then, hit “Create Filter.”
If you change your mind about screening out a contact, just click the Gear icon, select “See all settings,” then click the “Filters and Blocked Addresses” tab. From here you can delete the filtering rules for any of your contacts, with the most recent ones appearing at the bottom of the list.
Microsoft’s Outlook.com also has a simple process for screening out contacts:
- From your inbox, right-click on the message and select “Create Rule.”
- Choose your “Screened Out” folder from the “Select a folder” prompt.
- Check off “Run this rule now in Inbox,” then click OK.
To stop screening a contact in Outlook, hit the gear icon in the top-right corner, then head to View all Outlook settings > Mail > Rules, then hit the trash icon next to any contact you’ve filtered out.
Once you’ve banished a few contacts, muscle memory should set in, and you’ll be punting people to your Screened Out list with barely a second thought. And if you ever need to free up some email storage space, you’ll have an entire folder full of messages that you can send to the trash.
Check out Jared’s Advisorator newsletter for more tech advice, tips, and app recommendations.
Recognize your brand’s excellence by applying to this year’s Brands That Matter Awards before the early-rate deadline, May 3.
