
As our digital libraries get larger and larger, we’re fortunate to be living in a time when cloud-based storage keeps getting cheaper and cheaper.
Whether you’re ready to ditch physical backup drives or you’re looking for the convenience of online file storage, it’s easy to get started and stay synchronized. You probably already have a Google account with space available on Drive; why not use it to protect your vital files and folders?
I’m stepping through this process using a Windows machine, but it’s a similar affair on a Mac. Let’s light this candle.
First, check your storage
You’ll obviously need enough storage in your Google account to back up all your files, so swing by your storage page to see what’s available.
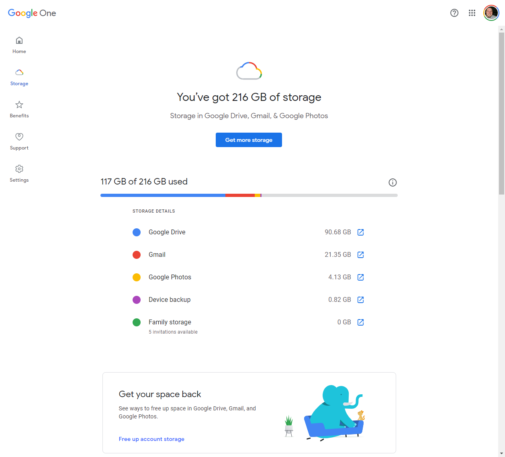
I pay $30 a year for 200 GB of storage, which has been more than enough for me. You can get 100 GB for $20 a year or, if you’ve got a lot of big files—such as videos, for instance—the $99-per-year 2 TB option might be your best bet.
At the very least, make sure you have at least some storage available—perhaps tens of gigabytes—and then pay for more storage if you run out of space. You can also use Google’s storage management tool to free up some space in your account as well.
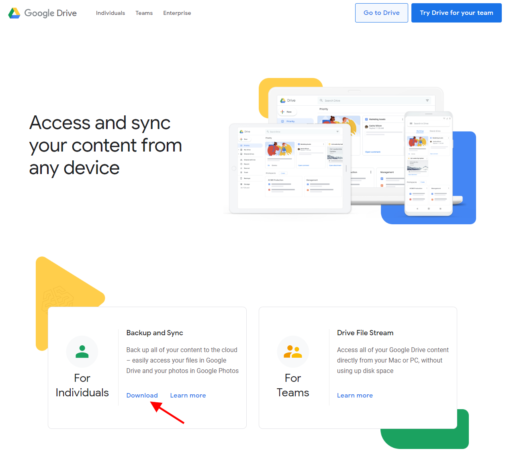
Download and run the software
You’ll need to download Google’s Backup and Sync tool, which is a reasonably painless piece of software that runs in the background.
Once that’s done, install the app and sign in to your Google account once it’s running.
Choose the folders to back up
Now’s the fun part: deciding which folders to immortalize. Google will suggest some oft-backed-up folders for you, and you can add any other folders you’d like to back up by clicking the “Choose Folder” link and selecting your additional folders.
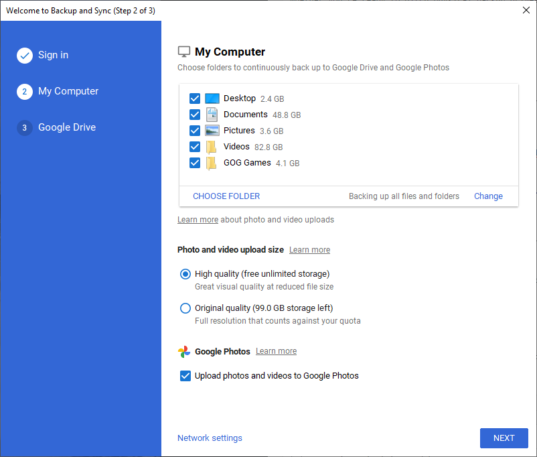
From this screen, you can also choose to shrink any photo uploads somewhat and have them not count against your storage quota. To do that, choose the “High quality (free unlimited storage)” option. There’s a handy option that uploads photos and videos directly into your Google Photos account as well.
Once you’re ready, click the Next button.
Do you want to sync your Google Drive files back to your computer?
If you’ve already got a bunch of stuff stored on Google Drive and you’d like to keep a copy on your computer, you can do so in this step. Choose to sync everything or only specific folders. This is also a great option for synchronizing files between two or more computers.

If you only want to back up your computer’s files into Google Drive, uncheck the “Sync My Drive to this computer” up at the top of the modal.
Start the initial backup
Once you’re ready, click the blue Start button in the lower-right corner and . . . well, that’s about it. The files in the folders you’ve selected for backup will start making their way to your Google Drive account.
Tweak your connection speed
The process could take hours (or days) if you have a lot of big files and/or a slow internet connection. If you have a slow connection, it’s a good idea to limit the amount of bandwidth the app is allowed to use for uploading and downloading your files.
To change this setting, open the Backup and Sync app, select the Settings menu, and then click the “Network Settings” link.
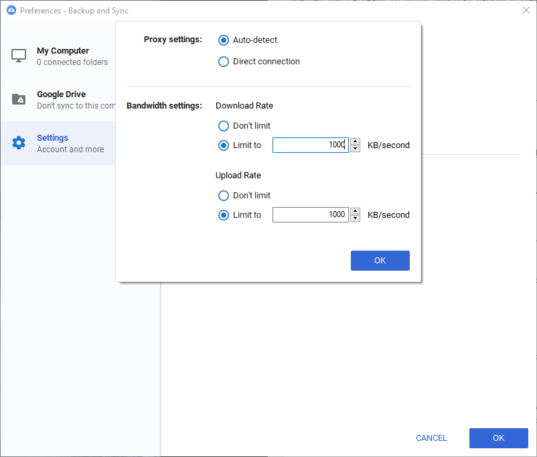
Run a speed test on your machine—here’s a good one—and then plug your download and upload results into this calculator here.
Then divide the results by 10 and enter them into the bandwidth settings of the Backup and Sync app so that you’re allowing only about 10% of your download and upload bandwidth to be used for backups.
What about physical backups?
It could be argued that you can never have too many backups. At the very least, it’s never a bad idea to have a cloud backup and a physical backup.
And if you thought online storage was getting cheaper and cheaper, then wait until you get a load of how cheap physical backup drives have gotten. Search your favorite retailer and you’ll likely be able to find 4 TB drives at south of $100.
Using software that comes with the drive, the setup process should be roughly the same as what’s been outlined above: connect the drive, choose the folders to back up, and let it do its thing. (If you’re on a Mac, you can use Apple’s Time Machine utility.)
Two big features you’ll want to look for are automatic backups—which should be table-stakes at this point—and the ability to access your backed-up files remotely like you can with Google Drive.
Recognize your brand’s excellence by applying to this year’s Brands That Matter Awards before the early-rate deadline, May 3.
