All right, I’ll admit it: I have a bit of a problem.
Most people pick an email service, set it up, and then use it—end of story. Me? I’m constantly fiddling with my inbox and working to find new tricks to make it more efficient. It’s an obsession. And I can’t stop.
Can you really blame me, though? From scrutinizing Gmail’s settings to coming up with crafty ways to resuscitate abandoned features—sometimes even concocting kooky hacks for making the most of simple-seeming elements like labels—there’s always some new virtual gem just waiting to be uncovered.
And when it comes to Gmail, the hunt for next-level efficiency hacks doesn’t even have to be limited to what Google itself provides. Powerful app-connecting services like Zapier and IFTTT allow you to expand Gmail’s capabilities in some pretty impressive ways by bringing advanced yet effortless forms of automation into your inbox. The only problem is that searching for worthwhile options within those sorts of services can be a time-consuming, frustrating, and often ultimately fruitless journey.
Luckily, that’s precisely what I’m here for (the whole “efficiency obsession” thing—remember?). I scoured through hundreds upon hundreds of Gmail-enhancing automation possibilities and found seven that stood out both for their usefulness and for the clever things they’re able to accomplish. They’re all free, with one noted exception, and they’re generally quite simple to set up.
Read on, and see which superpowers seem properly suited for your email environment.
1. Create a super-fast forwarding shortcut
Do you find yourself frequently forwarding messages to the same people—your work team, your bosses, your family, or even yourself at an alternate email address? Well, save yourself precious time, and set up a two-click shortcut to get the job done.
First, go to Gmail and create a new label called “Forward.” The quickest way to do that is to open a message in your inbox, click the label icon at the top of the screen, type the word “Forward,” and then hit Enter.
Next, open this Zap at Zapier and click the blue “Try It” button. The service will prompt you to sign in, if you haven’t already; make sure to use the same Google account you use for your Gmail. Then, follow the “Advanced Mode” steps to set up the Zap with your “Forward” label as the trigger and “Send Email” as the action—using your desired recipients in the “To” field, the Subject variable in the “Subject” field, the HTML option in the “Body Type” field, and the Body HTML variable in the “Body” field. You might also want to put the From Name variable into the “From Name” field and the From Email variable into the “Reply To” field so that your recipients can see the message’s original sender and reply directly to that person instead of to you.
It sounds like a lot, but don’t panic: Zapier walks you through every step of the setup and makes it as simple as can be.
Once you finish and activate the Zap, all you have to do is assign any message in Gmail to your new “Forward” label—by selecting or opening it within Gmail, clicking the label icon at the top of the screen, and then clicking “Forward” from the menu that appears—and just like that, the message will automatically be sent out to everyone on your forwarding list.
2. Automate your attachment storage
Maybe you have certain types of messages where attachments always need to be saved to a sharing-friendly cloud location—incoming invoices from clients, reports or presentations from contractors, or whatever the case may be. Why not let Gmail handle the heavy lifting by saving attachments to the cloud for you?
Just set up this Zap for Dropbox or this Zap for Google Drive. Either one will let you specify a Gmail label to monitor, be it a label you’re already using for the messages in question or a new one you create specifically for this purpose. And then, it’ll automatically save any associated attachments to the storage service and folder of your choice.
With that one-time setup finished, all you have to do is add the label onto a message as needed—or better yet, create a filter within Gmail’s settings to have the label added automatically based on something like the sender or the subject—and then rest easy knowing any attachments will land right where you want ’em, without any effort or remembering required.
3. Send starred Slack messages to Gmail for safekeeping
The next time you see something in Slack that you want to save or be sure to remember, beam it on over to your inbox simply by starring it in Slack.
This Zapier Zap is the key to making it happen. Click the blue “Try It” button on the page and follow the steps to connect the service to your Gmail and Slack accounts. After that, you’ll click through a handful of screens that’ll be preconfigured to do what you want, and then you’ll reach a point where you can select exactly where your Slack-generated emails will go and how they’ll be presented. Be sure to put in your own email address and whatever subject line you’d like and then to put the Text variable into the “Body” field.
Click all the way through and activate the Zap, and that’s it: Anytime you star something in Slack, it’ll show up in your inbox a few seconds later.
4. Give yourself a handy Evernote connection
Evernote adorers, take note: With a few minutes of painless planning, you can create a special label within Gmail and then have messages assigned to it automatically synced over to your favorite Evernote notebook.
It’s the same basic concept from our first item, only now with Evernote as the destination. Just create a new label in Gmail for the purpose, set up this Zapier Zap, and you’ll be good to go. (You can also use the starring of a message in Gmail as a trigger, if you’d rather; use this Zap if you want to go that route.)
This connection can work both ways, too: With this Zap, you can instruct Zapier to email you (or anyone else) anytime a new note is added into a specific Evernote notebook. I believe that’s what people with made-up job titles like “thought leader” call synergy.
5. See important Twitter activity in your inbox
Constantly searching Twitter for specific name or keyword mentions can be a real hassle—so why not get automated alerts for whatever type of activity you need to monitor? This Zapier Zap will let you specify a Twitter username or even a keyword and then get ongoing alerts (to you and to anyone else you want to include) whenever your term is mentioned.
You can supplement that with a daily, weekly, or monthly digest, too—an easy way to stay on top of what’s going on without getting overwhelmed by constant interruptions.
Note, however, that this Zap requires multiple steps of automation—which means, unlike the other items on this page, it requires a paid Zapier subscription in order to operate. Zapier’s paid plans start at $20 a month for individuals and $250 a month for unlimited-user business accounts.
6. Sync your smartphone notifications to your inbox
Even in 2019, smartphone notifications are still vexingly ephemeral: If you swipe one away inadvertently or even just restart your phone while an alert is still present, you’ll probably never see the notification again. So make sure you never lose track of something important by syncing your highest priority alerts from your phone to your Gmail inbox.
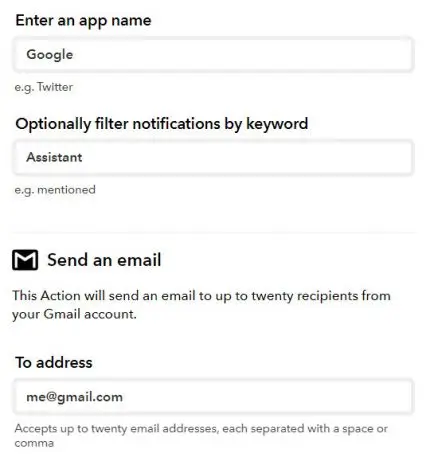
This one’s available only to the Android-using folk among us: Just open this applet at IFTTT and click the big “Connect” button. The service will prompt you to sign in and authorize it to access your account, if you haven’t already done that; just like with the other items in this list, make sure to use the same Google account you use with Gmail.
After that, follow the steps that show up for configuring the connection—entering in the name of the app whose notifications you want to sync and optionally a keyword that needs to be present in order for a sync to occur. For instance, you could enter “Google” for the app name and then “Assistant” for the keyword, and you’d get email-based copies of all reminders and other Assistant-related alerts.
Finally, type in your email address (or any other address where you want the notifications to be delivered), and then click the “Save” button at the bottom of the screen.
All that’s left is to install the IFTTT Android app on your phone, open it up, and follow the steps to sign in and grant it the necessary permissions. Then just sit back and watch as any included notifications magically appear in your inbox moments after they pop up on your phone.
7. Let your inbox prepare you for precipitation
Last but not least, a handy way to stay ahead of the weather: Connect this IFTTT applet, configure it for your location, and then get an email any night when rain is expected the following day. You can even set it up for snow, if you want.
However you configure it, your inbox will effectively be transformed into your own personal forecaster—with alerts that’ll always reach you, no matter what type of device you’re using or what apps you have installed.
For even more next-level Google knowledge, check out my Android Intelligence newsletter.
Recognize your brand's excellence by applying to this year's Brands That Matters Awards before the early-rate deadline, May 3.
