
There are few souls left in the modern era who haven’t been touched by PowerPoint in some way or another, good or bad, knowingly or unknowingly.
And while there’s no shortage of articles telling you how to improve your presentations, this article here is for those of you who want to work smarter, not harder, inside the belly of the beast. (Please note: These tips leverage PowerPoint for Office 365 on a Windows 10 computer and may not be universally compatible across other versions and platforms.)
1. Fun with photos
Nothing bolsters a deck quite like a good image, and you’ll need a lot of them if you’ve got a lot of slides. For starters, you can copy an image from the web and paste it directly into PowerPoint. You don’t need to download the image first, then drag it into the app. Just copy, then paste.
Second, if you find yourself building explainer or tutorial-type presentations fairly often, make sure to leverage PowerPoint’s built-in and reasonably slick Screenshot tool to quickly grab shots of your desktop. It can be found under Insert > Screenshot in the menu bar and allows you to insert all or some of your screen directly into the slide you’re working on. If you need a live-action recording, use the “Screen Recording” feature on the right-hand side of the menu in the Media section instead.
And finally, if you find a great image on the web but the background is just a bit too busy, use the handy Remove Background tool. Click on the image and select the Picture Tools > Format menu item that appears on the far right, followed by Remove Background. PowerPoint does an OK job of intelligently removing the background for you, but make sure to use the “Mark Areas to Keep” and “Mark Areas to Remove” tools to paint around the sections that need a little help before choosing “Keep Changes” to lock everything in.
2. Jump around
Deliver enough presentations and you’ll inevitably run into the one audience member who, when you’re on slide 135, asks you to jump back to the chart on slide 12. Now, you could click back through 123 slides like a real heathen. Or—or!—you could learn to jump directly to any slide in your deck simply by pressing its corresponding keys on the number row of your keyboard and hitting Enter. It’s truly a dazzling feat to behold and an arrow that should remain in your PowerPoint quiver at all times.
3. Clone yourself
Here’s a tip that none of the fat cats in the corner offices need to know that you know. If you find yourself delivering the same virtual presentation again and again and again, you can prerecord the whole thing—voice track, slide changes, and all—with relative ease.
First, record your talk track using your favorite audio recording software. You can record it directly inside PowerPoint if you like, under the Insert > Media section. Get it just how you like it.
Once your audio file is ready, drop it into your first slide. Then with the audio clip selected, click Playback under the Audio Tools menu item and make sure to check “Hide During Show” and “Play Across Slides” and then from the Start pulldown, choose Automatically.
Now for the fun part. We need to set the slides to advance automatically in time with the audio track. Select the first slide from the Slide Sorter on the left hand side, then click into the Transitions menu, and over on the right, deselect “On Mouse Click” and select “After:” and input the amount of time the slide should stay up before advancing to the next one. Do this for each slide in your deck, save it, and you’ve basically got a very consistent, repeatable presentation that can be played wherever, whenever. Press play, sit back, and zone out.
4. Grab them with movies
Sometimes a quick, informative video is all you need to prove your point. And PowerPoint’s built-in online video grabber is about as simple as it gets. In the Media section of the Insert menu, just click the Video button and choose “Online Video…” to then paste in the URL of the video you’d like to embed. It’s capable of seamlessly pulling in videos from the likes of YouTube, Vimeo, and other popular video sharing sites.
5. Pick the right file format
News flash: Not everyone has PowerPoint, and not everyone wants to use it to view your content. Thankfully, it’s dead simple to output your presentation to more universally friendly formats.
One great option is to export it as a video and then upload it to YouTube and other video-sharing sites. When you’re saving your file, the file type drop-down defaults to “PowerPoint Presentation (*.pptx),” but if you change it to “MPEG-4 Video (*.mp4)” it’ll be saved as a video file you can upload, share, and edit.
Another handy option is to output your slides as individual images. For that, change the format to “PNG Portable Network Graphics Format (*.webp)” at which point you’ll get the option to save the slide you’re currently working on as a single image or to output all your slides as images. This works well for quickly sharing a slide via email or for importing the deck into more powerful image and video editors.
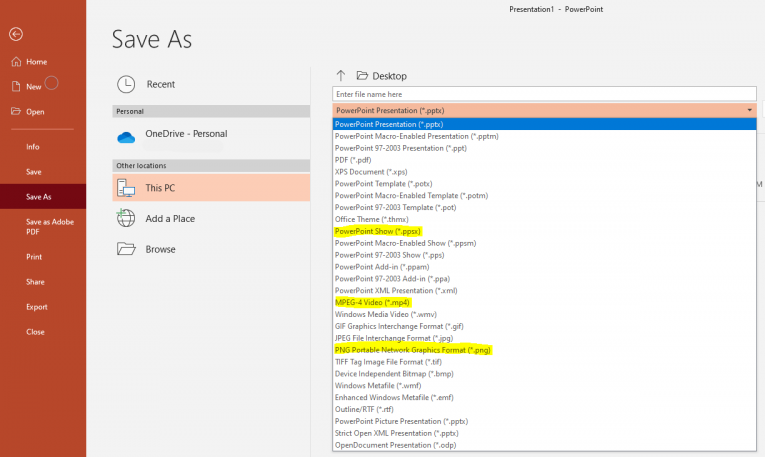
And finally, an excellent bonus format once your deck is rock-solid: Change the output to “PowerPoint Show (*.ppsx)” to open the file directly into presentation mode. A quick double-click and you’ll launch straight into the action.
Recognize your brand’s excellence by applying to this year’s Brands That Matter Awards before the early-rate deadline, May 3.
