When Google launched Inbox in 2014, the company embarked on a bold mission: to reinvent the very way we think about email.
In essence, what Google wanted was a do-over. Gmail, a decade old at the time, was starting to feel ill-suited for taming the wild beast email had become. Inbox was designed to be a “completely different type of inbox,” as then senior VP Sundar Pichai put it at the time—a “better way to get back to what matters.” It didn’t look or feel like Gmail, Pichai explained, and that was the very point of its existence.
As it turns out, reinventing email on such a foundational level may have been too bold of a gamble. Despite its devoted base of users, Inbox evidently didn’t amass enough adopters to warrant Google’s ongoing investment. After bringing a few of the service’s features into Gmail earlier this year—including easier access to attachments, native support for snoozing, and cross-platform availability of predictive text for composing—Google announced last week that it would discontinue Inbox and shut it down for good in March.
But for all the ways Gmail has followed Inbox’s lead, many of Inbox’s best ideas haven’t made their way over. If they face extinction, it would be a shame not only for Inbox devotees, but also for anyone interested in maximum email efficiency.
That’s why I decided to embark on my own bold mission: to find a way to let Google’s cleverest email concepts survive in a post-Inbox world. Once you’ve invested some time in configuring the following workarounds, you’ll find yourself with a supercharged email environment—one that brings the best remaining bits of Inbox directly into Gmail, where they’ll remain at your fingertips through March and beyond.
Ready?
Part I: Save links to your inbox
One of the first Inbox features I came to rely on was its ability to save articles from the web with a single click (or a couple taps in the mobile app). Whatever you saved would then be treated as its own item within your inbox; you could even snooze it, just like an email, so you’d remember to look at it when the time was right.
It’s easy to replicate this function externally, of course, with an app like Pocket or Instapaper—but if you’re anything like me, articles saved to those sorts of standalone services tend to do little more than collect virtual dust. Saving something important to your inbox is a more effective way to ensure it catches your eye, especially with the option of snoozing available.
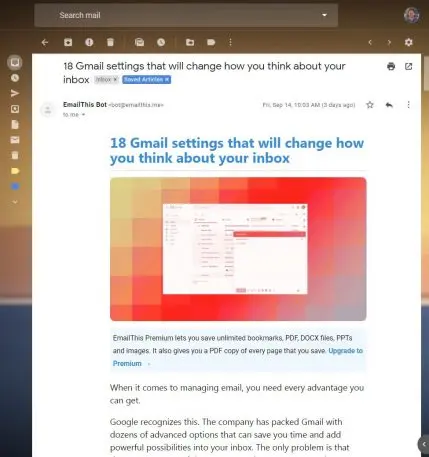
The best way to bring link saving into Gmail is with an add-on called Email This. Just add the Chrome, Firefox, or Opera extension into your browser and register your email address with the service. Then, anytime you click the icon in your address bar, the service will send the entire contents of the page you’re viewing—with ads and other extraneous elements stripped out—into your inbox. It’s basically like Pocket or Instapaper, only it uses your inbox as an interface instead of requiring you to rely on an external app.
You can save articles using Email This from your phone, too, though the process is a bit more complicated. For iOS users, the only real option is to share an article into Gmail and then send the message to save@emailthis.me. The service will then process the page and send it back in a self-contained, fully formatted email a moment later.
For Android users, there’s an easier way—though it’s a minor pain to set up. First, tap the blue “Get Started” button in the initial welcome message Email This sent you upon confirming your address. On the page that opens, tap the “Add the bookmarklet to an Android device” link and then tap the blue “Copy to clipboard” button. After that, tap the three-dot menu icon in your browser’s upper-right corner and then tap the star-shaped icon in the menu that appears.
Look for the bar at the bottom of your screen that says “Bookmark saved” and tap the “Edit” command inside it. Now, change the name of the bookmark to “Save” (without the quotes)—then erase what’s in the URL field, long-press that empty space, and paste in the code you copied a moment ago. (It should be a lengthy string that starts with the word “javascript.”)
Once that’s done, hit the back button in the top-left area of your screen—and that’s it: The next time you come across an article you want to save, simply tap the address bar while viewing it and type in the word “Save.” Select the option labeled “Save” (the one with a URL that begins with “javascript”), and the article will be on its way to your inbox.

Oh, and one final tip: When you see your first saved article in Gmail, open up the email from the desktop site, click the three-dot menu icon at the top of the screen, and select “Filter messages like these.” Click “Create filter” in the box that appears, then select “Apply the label” followed by “New label.” Enter the name “Saved Articles”—and then, every time a new saved article arrives, it’ll automatically be grouped with that label. That’ll set such items apart from your regular messages, and it’ll also give you a handy way of browsing through your saved articles in the future.
Email This is free for up to 20 article saves per month. If you want to save more than that, you can pay $19 a year for a premium subscription, which also includes the ability to add searchable notes onto saved articles.
Part II: Get reminders in your inbox
Having a centralized place for viewing and managing reminders is the Inbox feature I’m most bummed about losing. Sure, there are countless other ways to collect reminders on digital devices, but they lack the simplicity, prominence, and seamless integration Inbox’s setup provided.
After much contemplation and experimentation, I’ve found a way to emulate this setup within Gmail. The workaround relies on Google Calendar as its backbone: Anytime you want to set a new reminder, you create an event in Calendar that begins with the word “remember” (don’t worry: I’ll give you some super-simple shortcuts for doing that in a minute). The item will then show up in your calendar, just like an old-fashioned Google reminder, and you’ll get a notification via the Calendar app when its time arrives.
But—critically—the item will also show up as a reminder in your inbox, following the Inbox model. That way, even if you ignore or miss the notification, your inbox will act as a centralized to-do list in which all of your tasks remain until dismissed. Yes, you could just use the new Google Tasks app instead—but despite its presence in the Gmail website’s sidebar, it has no meaningful integration with your actual inbox; you still have to go out of your way to open it in order to see any pending tasks. It also has no Gmail integration whatsoever on mobile, and it lacks basic features like the abilities to set times for reminders and to set recurring alerts.
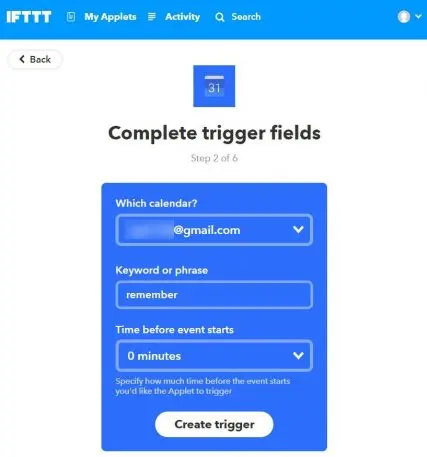
This one’s especially involved to set up, but I promise: It’s worth it. First, head over to IFTTT—a fantastic free utility that connects different web services together. Either sign in or register for an account, then click “My Applets” at the top of the site and click the “New Applet” box in the top-right area of the screen. That’ll let you create your own new automation sequence, which is what’ll allow your Calendar-created reminders to appear in your inbox.
Click the “+this” on the next screen, then type “Google Calendar” into the search box and select the Calendar icon. Select “Event from search starts,” type “remember” (without quotes) into the keyword box, and click the “Create trigger” button.
Now click “+that,” type “Gmail” into the search box, select the Gmail icon, and then select “Send yourself an email.” Click the subject field and delete everything except for “{{Title}}.” Then, click the body field and delete everything except for “{{Description}}.”
Next, click the attachment field and delete everything, leaving it blank—and then click “Create action” to save and finish. Finally, on the confirmation screen that appears, turn off the toggle next to “Receive notifications when this Applet” and click “Finish.”
Take a deep breath: The hardest part is over. The last big step is simply to create a filter in Gmail that’ll detect these reminders and label them accordingly. Go into Gmail’s settings on the desktop, select “Filters and Blocked Addresses,” and scroll down until you see a “Create new filter” option.
Click that, then type your email address into the from field and type “remember” (without quotes) into the subject field. Click “Continue,” then select “Apply the label” followed by “New label.” Name the label whatever you’d like; I used “** REMINDER **” for mine, but you could go with “TO DO,” “TASK,” or anything else.
Once your label name is in place, click the “Create filter” button—and for the finishing touch, find your new label in Gmail’s left-hand panel, hover your mouse over it, and click the three-line menu button that appears to its right. Select “Label color” and change the color to a pale yellow Post-It-like hue.
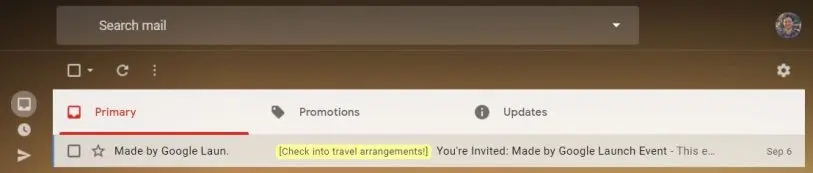
And that’s it: Anytime you create a new calendar event that starts with “remember,” you’ll automatically be alerted at the appropriate time via Google Calendar—you may want to take a quick glance at Calendar’s settings to confirm that your default notification time is set to “zero minutes”—and the reminder will then appear inside your inbox with a yellow-highlighted label, so you’ll be sure not to miss it.

Last but not least, take note of these easy options for quickly creating reminders using this new system:
- Anywhere you can access Google Assistant, say or type “Add to my calendar,” “Add to calendar,” “Create an event,” or “Create event” followed by your reminder and the day and time on which it is due—so, for example, “Add to calendar, remember to eat lunch at noon” or “Add to calendar, remember to send invoice Friday at 3 p.m.”
- Type any of those same commands into the Chrome address bar or Google search box on any computer or mobile device where you’re signed in.
- Open the Google Calendar box in Gmail’s new right-hand side panel and click on any day and time to add a reminder from there.
- Install the Checker Plus for Google Calendar Chrome extension, then type “chrome://extensions/shortcuts” into your address bar, find the extension on the page, and create a keyboard shortcut (such as Alt-C) for activating it. Then, any time you want to add a new reminder, just press that key sequence, type “remember to” followed by your actual reminder, and hit enter when you’re done.
- Install the IFTTT app on your Android or iOS phone and create a widget using the “Quickly create events in Google Calendar” option. You can then tap that widget anytime you want to set a reminder; just like with all the other methods, as long as you start your event with the word “remember,” it’ll automatically play into this system.
Remember, too, that you can use this setup to create recurring reminders, just like you could in Inbox. And if a reminder pops up that you aren’t ready to deal with right away, you can snooze it using Gmail’s built-in snoozing command.
If you want to create a reminder that appears only in your inbox, meanwhile, without a notification—similar to what would happen when you’d create a reminder directly within Inbox—just send yourself an email with the reminder (starting with the word “remember”) as its subject line. You can then leave it there or snooze it for whenever you want.
Part III: Edit reminders in your inbox
Inbox offered an exceptionally easy way to edit reminders: You could just click or tap their text and then change it as needed. If you want that same kind of power in Gmail, grab the Rename Email Chrome extension. It adds a simple button into Gmail’s toolbar that allows you to change the subject line of any item in your inbox, which works wonderfully for this system. (As of now, unfortunately, there’s no mobile equivalent.)
Just be sure you’re comfortable with the providing company’s privacy policy, as unlike the other solutions in this article, this extension does require you to grant it full access to your email in order to operate. (In short: The company promises it never stores your emails, and its business model appears to be using its free email extensions to encourage folks to upgrade to its subscription-based productivity offerings.)
Part IV: Attach reminders onto individual emails
In addition to its regular reminder system, Inbox allowed you to add notes and reminders onto individual emails—something I found to be invaluable, especially when snoozing a message to a later date.
To create a similar function in Gmail, look no further than the open-source Simple Gmail Notes Chrome extension. The extension adds a small (and customizable) box atop every thread in your inbox. Click that box and type a note, and it’ll remain permanently associated with that email; you’ll see it anytime you open the message, and you’ll even see a snippet of it in your main message list.
Simple Gmail Notes uses your own Google Drive storage, and the only permission it requires is the ability to view and manage Drive folders that the extension itself creates.
The only real downside is that your email-attached memos won’t be easily accessible via mobile. If mobile access is critical to you, you could consider the similarly named Gmail Notes extension instead. That extension does allow you to see (though not edit) notes from the Gmail mobile apps, but it requires full access to all of your email, which you may or may not want to provide. Its desktop integration isn’t ideal, either—unlike the other extension, it shows reminders only when viewing messages in full and not also from the main message list—so unless you absolutely need mobile access to your in-email memos, Simple Gmail Notes is the better all-around option.
Part V: Automatically organize travel summaries
Inbox automatically found and collected travel-related itineraries, reservations, and confirmations and then used them to create convenient summaries of upcoming trips. While there’s no way to get that same capability within Gmail itself at this point, you don’t have to give up on it altogether.
Just download the standalone Google Trips app, available for both Android and iOS. It pulls data from your email, just like Inbox did, and creates those same travel summaries—and while it doesn’t exist inside your inbox, it does provide some compelling new perks, such as contextual suggestions of noteworthy restaurants, attractions, and even full day plans in the areas you’ll be visiting.
(And yes, I realize the lack of Gmail integration makes this a slight exception to this story’s main focus. But being able to hang onto this feature, even externally, seemed worthwhile enough to warrant a mention.)
Part VI: Zip around your inbox with smarter shortcuts
Inbox made getting around its desktop interface easy, with emails that opened in-line and simplified shortcuts for moving in and out of messages. While you can’t re-create that entire interface in Gmail, you can adopt a couple of its significant elements.
Head into Gmail’s settings on the desktop and select “Advanced.” Find the line labeled “Custom keyboard shortcuts,” click the “Enable” button next to it, and then click “Save Changes” at the bottom of the screen.
Once Gmail reloads itself, go back into the site’s settings and look for the newly added “Keyboard Shortcuts” option along the top. There, you can add alternate keyboard shortcuts for common commands—such as those you’re accustomed to using from Inbox.
Two Inbox-initiated shortcuts I’ve come to appreciate are “ESC” for “Back to threadlist,” which lets you hit your Escape key to exit any thread and return to your previous screen, and “i” for “Go to Inbox,” which lets you jump back to your main inbox view from anywhere with that single letter keypress.
Part VII: Swipe to snooze from your smartphone
Miss the ability to swipe a message to snooze it from your phone, as Inbox’s mobile apps allowed? You can actually set up the same command within Gmail—on Android, at least: Open the app’s settings, select “General settings,” then select “Swipe actions.” After that, tap “Left swipe,” select “Snooze,” and prepare to return to your familiar workflow.
(Google hasn’t said if or when that option might make its way to iOS.)
Part VIII: Sweep away entire sections of messages at once
Gmail doesn’t make it especially easy to archive entire clusters of messages, as Inbox did, but there is one way to dismiss a bunch of emails at once in a vaguely similar manner: While viewing a category on the Gmail desktop site, click the square-shaped icon in the upper-left corner of the toolbar above your messages. That’ll select all the messages on the screen.
If there are any messages in the group you want to keep, click the checkmark alongside them to unselect them from the list. Then click the archive icon—the box with a down-facing arrow, in the toolbar at the top—to send all the other messages out of your inbox and into your archive.
Alternatively, you can star any messages you want to keep (à la pinning)—then click the downward-facing arrow next to the select icon, click “Unstarred” in the menu that appears, and click the archive command to dismiss everything else.
Once again, annoyingly, there’s no equivalent for the mobile apps as of now.
Wait—what about bundles?
One last area that can’t be ignored is the way Inbox intelligently sorted messages into categories like “Purchases,” “Finances,” and “Low Priority” and then presented those messages as bundles within your inbox. You could opt to have any bundle appear immediately, as new messages arrived, or choose to have it show up only once daily or weekly to cut down on distractions and allow for more efficient triage.
Well, bad news: Right now, there’s no great way to emulate bundles within Gmail. The app’s default inbox style, in which mail is sorted into five category-based tabs, is about as close as it gets.
But wait! There’s good news, too: Google has confirmed it will be bringing bundles into Gmail at some point in the foreseeable future—and while the company isn’t committing to any specific time frame, somewhere ahead of March’s scheduled Inbox shutdown seems like a sensible bet.
In the meantime, you could turn to something like Sanebox—a favorably reviewed third-party service that sorts emails into a handful of high- and low-priority categories for you (assuming you’re okay with granting the company full access to your email, as per its privacy policy, and don’t mind paying $59 a year for the service). But it might be worth just hanging tight and either clinging onto Inbox for a little while longer, or making do with Gmail’s tabbed-based sorting setup in the short term.
This problem should solve itself soon—and between that and the other workarounds on this page, you should be able to stop mourning and start moving on to a productive post-Inbox email existence.
Recognize your brand’s excellence by applying to this year’s Brands That Matter Awards before the early-rate deadline, May 3.
